Monday, April 25, 2005
Still Pluggin' away
The last two weeks have been a little less action and a little more thought. We finished up the sacrificial frame pieces and have started mounting the front transom. Since this is a precise process, we've put a lot of thought into the process, but haven't made much noticeable progress. The key through all of this though, is to make sure we keep on keepin' on.
Sunday, April 10, 2005
BoatBuilding - Cutting the Frames
Over the last couple of weeks, we've been constructing temporary frame pieces, which we're cutting out of particle board. The reason we're doing this, and the process behind what we're doing will take a little bit of explaination, so be prepared for a long entry.
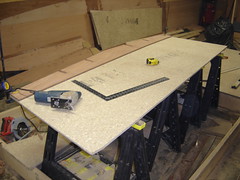
The reason we're cutting these temporary frame pieces is so that we're sure the hull is straight. If you look at the picture, you may notice two pieces of board... one smaller piece of board, sitting on top of the particle board. The smaller piece is the actual frame piece that will be in the boat when it's put on the water. The hull goes much farther up than this though, so we are using temporary pieces during the hull setting process. Once the hull is set, we will remove the temporary pieces and install the permanent pieces, so that we can add the deck.
In order to cut these sacrificial particle board frame pieces, we started with a 4x8 piece of particle board. We set the actual frame piece on the particle board and clamped it in place. We then determined the center point and line of the actual frame piece and extended this center line through the particle board, so that we could measure needed dimensions. After measuring the center line, we extended the end-lines of the permanent frame piece up the particle board, and measured from the center line to the top corners. In order to make sure our cuts were true, we measured cross-angle. we then added the notches and cut it all out with a power saw, except for the notches, where we used a jigsaw.
Click here to see the video summary of what we did.
Tuesday, April 05, 2005
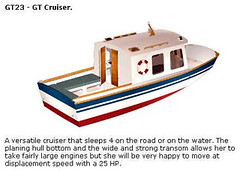
GT23 - GT Cruiser - Artists Rendering
Someone asked me recently what the finished product is going to look like. This is a computer model of the finished boat. Greg and I will probably make a few modifications to this design, and I'm very confident that he'll choose a different color scheme. But this should give you the basic idea.
Saturday, April 02, 2005
Mounting the transom to the frame.
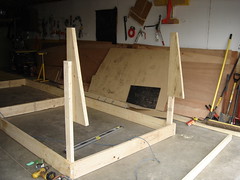
Last weekend we mounted the rear transom to the working frame. We started by constructing the vertical frame mounts. The vertical frame mounts were built from the bottom up, using 2x4s screwed to the 2x6 frame on the floor, and then screwing the two angle-cut 2x6s to the 2x4s. The angle-cut 2x6s are cut to the same angle as the stringers where they attach to the transom. This is shown in the first picture.
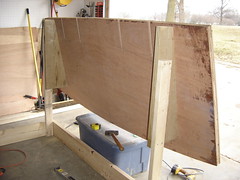
Next, we mounted the rear transom to the angle cut frame piece with screws. When you put the transom on the frame, make sure it's level and that the angle cut mounts are placed an equal distance from the center, and in a place that won't interfere with construction.
Subscribe to:
Posts (Atom)