We received an answer that thoroughly answers the questions regarding the fit problems we've encountered while assembling the hull. The short answer is that it's a combination of problems with how the kit was cut at the factory, and assembly error. If you're interested in the long version, I'm attaching the response from Jacques, one of the admins at www.bateau.com
---begin original message---
Here are Ryan's conclusion[s] and I agree with them. We have looked many times at this and suspected a problem if parts were cut from the nesting drawing. We found only discrepancy . Ryan's notes are in italic. My comments are in blue.
-----------------------
"The aft pieces of the hull bottom were too wide where they meet the middle pieces of the hull bottom. I laid out the plan spec dimensions on these pieces and had to cut off slivers approximately 5/8" wide, tapering down to 0", by 20" long, in order for these pieces to meet the plan specs and to get them to butt properly to the middle bottom hull sections. The cuts were on the outside of the pieces."
---->I have no clue about this. The nesting matches the dimensions.
That must have been a CNC machine problem. Fortunately, it was too large and easy to correct.
2) The aft and bow transoms were mounted on the building frame, at the distances and angles specified in the plans. A laser was used to precisely align everything. When the glued and assembled stringers were put in place, it was clear that they were about 3 inches shorter than the distance between the transoms. Part of this distance (1/2") can be explained by the fact that I did not account for the front cabin bulkhead fitting between the aft and bow portions of the stringers, as I had glued them up as one contiguous unit (instead of installing the bow portion of the stringers later, as indicated in the on-line building tutorial). However, having to recess the stringers 1/2 way into the transoms adds 9/16" for the bow transom and 1" for the aft transom (which is 2" thick for large motor usage). This adds up to: 3" - 1/2" + 9/16" + 1" = approximately 4 inches that the stringers were short. I do not recall what the exact measurements are, and I did not try and crawl under the boat to take them again. Thus, I cannot say whether this is a plan or kit error."
---->the kit: The transom that was in the nesting was too big. It was about 1-7/8" too big. The stringer tips in the nesting were about 1" too short.
The CNC file for those parts was taken from the nesting drawing but the nesting drawing is not to scale!
You corrected properly.
"This problem was corrected by moving the bow transom aft the proper distance so that the stringers would fit right. I knew this could change the way the bottom panels fit, so when we put the aft 3 building molds in, we reduced the distance between each of them a small amount. This was done because the bottom is much flatter in this area and I knew it would affect the shape/fit of the panels less than adjusting each mold position or just the front ones."
--->Once they do this.....the frames won't fit right.
That looks like an assembly mistake you made but again, you corrected it properly.
"Some of the kit frames were not wide enough. For example: According to the plans, Frame F should be 90-1/4" wide. The actual measurement is 88-1/4". Frame E should be 92-3/4", and the actual measurement is 90-3/4"."
---->The nesting matched the station dimensions....so I don't know about this.
Me neither . . . were those frames marked correctly?
"Several of the kit pieces that were supposed to be 3/8" plywood were actually 1/2". I have been able to work around this without too much problem and the small amount of extra weight should not affect the performance."
---->Not sure about this one either.
I discussed this with Eric. he asked permission to use 1/2" instead of 3/8 for cutting reasons. I checked and gave the OK, it has no effect on weigth (maybe 5 lbs total!) and can only be better question of strength.
-----------------------
Conclusion, it looks like there were some problems with the kit, some I understand, others not but you solved the problems. Sorry for those cutting mistakes. Email when you need paint or other supplies, we'll do something special.
All the dimensions on the plans are correct, it's a kit problem that does not affect those building from the plans. Eric and I have discussed this. In 95% of the cases, despite what we say on the plans (NTS = Not To Scale), our plans are to scale. Those parts were an exception. Right now, we do not cut kits from the nesting drawing anymore.
_________________
Jacques Mertens
---end original message---
My personal opinion on the whole deal...
The root of the problems were based on errors in the kit. The problem was exacerbated when we adjusted our assembly process upon encountering kit errors, resulting in a chain reaction of minor, correctable issues.
Jacques and crew have been instrumental in figuring out the root of the problem, and there's no doubt in my mind that they'll work with the kit manufacturer to ensure this doesn't happen again. Additionally, they appear to genuinely care about customer satisfaction, as evidenced by their promise to "do something special" next time we order supplies. Despite the fact that we've experienced these minor setbacks, I have been satisfied in my dealings with these guys, and I would freely recommend bateau for anyone who is building a houseboat (or any other type of boat.) "If you're building a houseboat, go to www.bateau.com for the plans, kit and supplies."
By the way, if you do end up ordering from bateau as a result of reading this blog, tell 'em that OzzyC sent you.
Tuesday, October 18, 2005
Sunday, October 16, 2005
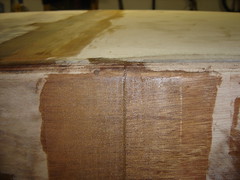
Bad Epoxy Joint
We also went over the taped joints one last time. This one was the worst. There was a large gap in the joint. The gap had no epoxy in it, and the tape had bonded poorly at the seam. We cleaned things up and filled the joint with thickened epoxy.
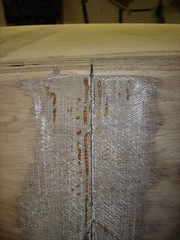
Not a single tape joint was truly smooth. There were "waves" in the epoxy, so we smoothed it all out by laying thickened epoxy, using a sqeegee.
Not a single tape joint was truly smooth. There were "waves" in the epoxy, so we smoothed it all out by laying thickened epoxy, using a sqeegee.
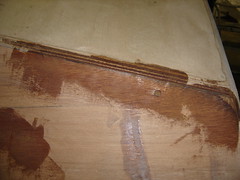
Patched Front Transom Gap
We went around the entire boat and patched all gaps, holes, gouges, and so forth, with thickened epoxy.
...and Then I Went to Help Greg...
... work on his boat.
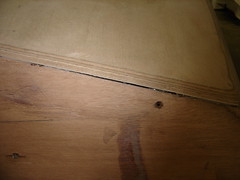
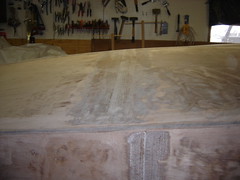
This week we did a final laying of thickened epoxy, in preparation for taping the seams.
In this photo, you will see a small gap between the transom and the hull, and a screw hole.
This week we did a final laying of thickened epoxy, in preparation for taping the seams.
In this photo, you will see a small gap between the transom and the hull, and a screw hole.
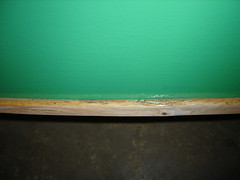
Flaw in the Rubrail
In a continuation of "back to basics" week, I will discuss this rubrail in a bit more detail.
We purchased 10-foot sections of oak, which is obviously too short for the entire canoe. We compensated for this by angle-cutting the oak sections and joining them together with epoxy. We did the joints at port-bow and starboard-stern, for load balancing. This way if we hit something that would break one joint, they both wouldn't break.
This spring, my boat hit a rock in rapids, and popped the rubrail joint. I tried patching the popped joint with gorilla glue, but that was inadequate for the job, and the joint popped again, (on a much smaller rock, at a much lower speed.)
As you can imagine, I was starting to get a little frustrated over my canoe continually "breaking." I figured it was time to do the job right, so I decided to sand and re-epoxy the joint from scratch.
Unfortunately, my daughter wanted to help, and due to a perfect storm of circumstances, I didn't quite mix the epoxy right, and it never quite set. Growing even more weary of this ongoing problem, I sunk a couple of bronze nails into the seams, figuring that would do it. That's when I sanded and painted the boat, and when I noticed the flaw in this picture. If you look VERY closely (not the best picture), you can see that there's no epoxy bonding the rubrail to the hull. Once the paint dries, but before I stain the rubrails, I will bond the rubrail to the hull with a thin line of unthickened epoxy.
Back To Basics
Building the Nice Canoes was our experiment. We built the canoes first, so we could get an idea of how much work building the GT-23 would be, and to make sure we were up for that kind of work.
I've had my canoe for about a year and a half, and I've used it a LOT. She was starting to show her age...
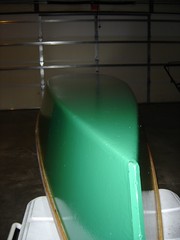
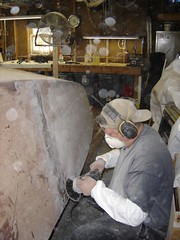
It was time for a new paint job. I sanded down the entire exterior, including the rubrails. This photo shows the paint job. Today or tomorrow I'll do a bit more painting, a little touch-up, and then it's into storage.
I've had my canoe for about a year and a half, and I've used it a LOT. She was starting to show her age...
It was time for a new paint job. I sanded down the entire exterior, including the rubrails. This photo shows the paint job. Today or tomorrow I'll do a bit more painting, a little touch-up, and then it's into storage.
Wednesday, October 05, 2005
Answers to Questions
As I mentioned in my last post, Greg asked a couple of questions about planing a swath along the seams, so the fiberglass lays flush to the hull after laying the fiberglass, as opposed to building up the layers of fiberglass, then fairing... thus saving us some sanding. Bateau recommended that we not do this. Here are a couple of other links that discuss the recommended methods of taping and sanding the seams...
Stitch and glue basic tutorial
Outside fiberglassing
Stitch and glue basic tutorial
Outside fiberglassing
Monday, October 03, 2005
Video Synopsis
It's been a while since we've made any significant progress on the boat, so we haven't done any videos for a while. In commemoration of what we've accomplished this weekend, we did a video. If you're interested, click here.
We plan to build the keel up one more time, and sand again, just to make sure we've got a straight line, and to make sure it's properly filled before we lay the fiberglass. If you're interested in seeing our plan for that, click here.
We plan to build the keel up one more time, and sand again, just to make sure we've got a straight line, and to make sure it's properly filled before we lay the fiberglass. If you're interested in seeing our plan for that, click here.
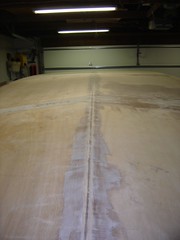
SandedHull
All of the seams are now sanded and rounded. We've got a procedural question in to the gurus about taping the corners. Apparently, some people plane the hull where the seams are, and the result is a lot less sanding. We'll let you know when we find out.
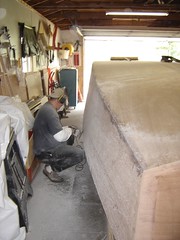
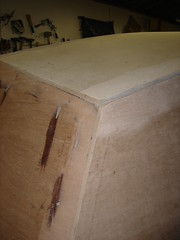
Trimmed Transom
Greg got the overhang trimmed from the front and rear transom, using a jigsaw. It looks a lot better now.
Subscribe to:
Posts (Atom)