We laid some more glass yesterday, but I'm going to digress a bit.
You may remember in an earlier post that we had a couple of spots where the fiberglass didn't adhere to the plywood. Our initial plan was to drill small holes in these areas and fill them with epoxy. Greg changed his mind. Instead, he cut out these areas with a knife, and filled it with a mixture of epoxy and fiberglass filler. My camera batteries were dead, so I don't have any pics of this, but I will attempt to get some pics posted soon.
After the fiberglass filling, we did a little last-minute sanding, and laid fiberglass on one side. We've now got about two-thirds of the exterior completely fiberglassed. We still have one side, and both transoms to do, but that should go relatively quick. Of course I'll post pictures.
Monday, December 26, 2005
Saturday, December 17, 2005
Other Uses for Epoxy and Plywood - Part IV
In this photo, you see that I've done part of the bottom, or side, section. I was fortunate that this section came off in one large sheet, so I didn't have to re-lay individual tiles. The hardest part of re-laying the tiles comes next. Wish me luck.
By the way, if you're interested, you can also see my other home improvement project on my other blog. I figured that it was more appropriate to post this project here, since it so heavily utilizes plywood and epoxy.
By the way, if you're interested, you can also see my other home improvement project on my other blog. I figured that it was more appropriate to post this project here, since it so heavily utilizes plywood and epoxy.
Other Uses for Epoxy and Plywood - Part III
You can see that I've used thickened epoxy and laid the tiles on the top section. It's not pretty, but it's functional - and waterproof. I plan to drill out the epoxy between the tiles and re-grout. That will make things less ugly.
Other Uses for Epoxy and Plywood - Part II
In this picture, you see that I have installed the scrap plywood. the plyowood has been sealed with epoxy, so it should stay waterproof for until I truly remodel this bathroom. I've screwed it all into place with waterproof screws, and you may see that I've test-fitted a block of tiles.
Thursday, December 08, 2005
Other Uses for Epoxy and Plywood
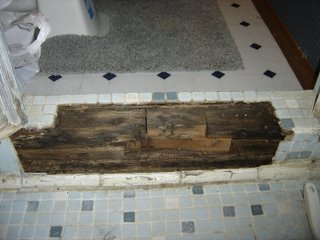
 By now, we're all familiar with using epoxy and plywood for building boats. But have you considered using plywood and epoxy for other jobs around the house? The previous owner of my house installed a tile shower, and used plain plain 2x4's and plywood for this water-catching lip. Over the years, water has gotten in here, and eventually it rotted away the plywood and the wood.
I'm not going to the trouble of completely ripping this out and starting from scratch, but I am going to repair it so it stays put until I'm ready to completely overhaul this bathroom. Enter the epoxy and plywood...
During the course of the next couple of weeks, I am going to epoxy the remaining wood, in an attempt to prevent any further deterioration. I will cut some scrap plywood to size and lay a protective layer of epoxy over that as well, which will waterproof the entire base. Finally, I will use thickened epoxy to stick the tiles back into place. Why epoxy instead of cement? Because I have the epoxy and plywood available. I'd have to go out and buy the cement. The only reason NOT to use wood is because of the rotting factor. By coating it all with epoxy, I have removed the potential for rotting.
Overall View
As you can see, our work paid off in the end. For the most part, it looks really good, and you can't really tell where we ran out of epoxy.
Next time we'll lay epoxy on the sides, then it's time to start fairing and sanding.
Next time we'll lay epoxy on the sides, then it's time to start fairing and sanding.
Drilling Small Holes
We're overcoming our problem by drilling small holes where the epoxy bubbles are. We will then inject epoxy into the holes and weight down the area, so the fit is as tight as possible in the end.
The Journey Continues
You may remember from our last couple of entries that we ran out of epoxy. In order to overcome this potentially disasterous problem, we heated the cured epoxy with a heat gun, and applied epoxy to the rest of the boat.
This picture shows that, for the most part, our approach worked incredibly well. However, also shown in the picture, we had a few spots that were completely starved and didn't adhere to the hull at all.
How did we overcome this problem??? Read on and find out.
This picture shows that, for the most part, our approach worked incredibly well. However, also shown in the picture, we had a few spots that were completely starved and didn't adhere to the hull at all.
How did we overcome this problem??? Read on and find out.
Subscribe to:
Posts (Atom)