I received a message from one of the administrators at bateau, requesting that I clarify something about the errors we're experiencing.
There are three possible places where these fitting problems could be occurring. Those places are the plans themselves, the kit, or how we as builders are executing these plans (or any combination thereof). At this point I honestly don't know the root cause of the issue. I will say unequivocally that the administrators at bateau have been incredible about working with us when we've experienced problems, and I will clarify for the record that it's highly possible that the issues are due to what we're doing and how we're doing it, as opposed to it being a problem with the plans or the kit we purchased.
Please do NOT take the contents of this blog as any intent to question the quality of the plans that bateau produces, nor the kits that they manufacture. This blog is designed to look at the building process... nothing more.
Monday, September 19, 2005


Sunday, September 18, 2005
A Nod to the Designer/Architect
In my last post, Dr. Howdy has (quite rightly) recommended that I give some credit to the designer/architect of this fine boat. Greg purchased the plans from www.bateau.com. I will work to find out more about the individual who designed this boat and will post as the designer deems fit.
Front Transom - Inside
This is the front transom from "inside" the boat. Again, the purpose of this round of work was to fillet the front and rear transoms. If you notice at the top center of this pic, the thickened epoxy dripped. Why??? Because we were too lazy to run to the store for good duct tape. we used package tape instead, it didn't hold, and the peanut butter oozed through. This will cost us a lot more work in the long run, when it's time to sand.

Filleting
In this picture, we are filleting the gap between the hull and front transom. In the picture you will notice the large gap filled with thickened epoxy. You see the stringer in the left-top of the picture, and you see that the stringer is covered with plastic, in order to prevent the stringer from sticking to the transom or hull during the epoxying process.

Another Shot of the Hull
In this picture, we've still got weights on the front end, because we haven't filleted the inside transom joints with thickened epoxy yet.

Coming Along Nicely
We've got the joints epoxied, and the zip ties are pulled out. You may notice a couple of sloppy tape joints. We'll need to fix them before we glass the whole boat. If you click on the picture, you'll be referred to flickr, where you can see a larger picture, and a note pointing out the sloppy tape joint.

Front Transom Overhang
The overhang on the front transom is more pronounced than the rear transom. Again, the hull extends past the front transom.
Though this makes for a bit more work, I'd rather have the pieces measure too large than too small. It's a lot easier to cut away the excess than it is to build on a piece that's too short.

Though this makes for a bit more work, I'd rather have the pieces measure too large than too small. It's a lot easier to cut away the excess than it is to build on a piece that's too short.
More Flaws in the Plans
This is a picture of where the hull and rear transom come together. If you look, you can see that the hull extends past the transom. In addition to this, we've discovered that the rear transom was also too wide, and we've had to shave some width from the port and starboard sides of the rear transom.

Sunday, August 28, 2005
Tying the Hull
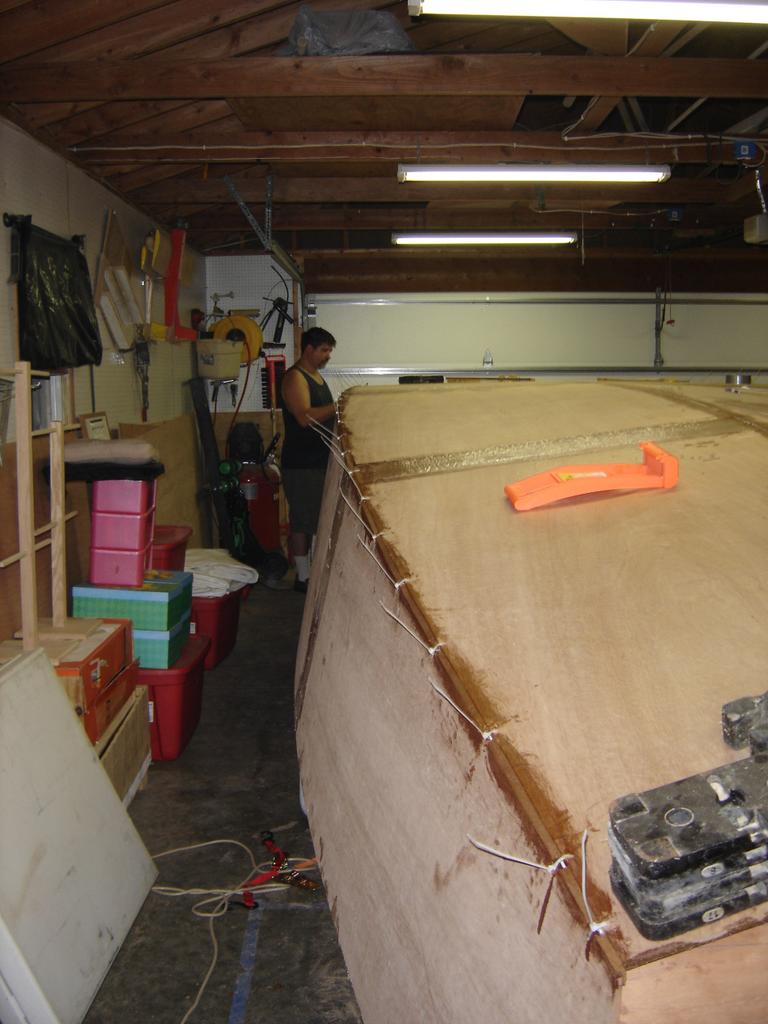
We've finally had an opportunity to get back to work on the boat. The weather was cool, our schedules were clear, so we worked. Last night we spent about three hours tying the hull and filling the gaps with thickened epoxy.
Monday, August 08, 2005
I Haven't Forgotten About You... or the Boat
We didn't do any boat work this weekend. Greg was out of town. We're probably not doing any boat work next week because it's gonna be my bachelor party. We won't be doing any boat work the weekend after becaust I'm getting married that weekend, and it's Greg and his daughter's birthdays. Are you seeing a trend here? I miss working on the boat.
But last weekend, we joined the bottom hull pieces together with thickened epoxy. Not much progress, but every little bit counts.
But last weekend, we joined the bottom hull pieces together with thickened epoxy. Not much progress, but every little bit counts.
Saturday, July 23, 2005

Crazy from the Heat
Like I said in my last entry, this heat's a killer. We started at around 7:30 and put in about 2 and a half hours. What did we accomplish? Unfortunately not too much.
When we did our test fit last weekend, we saw that the bottom panels were about two inches too wide. So this week we (actually it was just Greg) built a jig so we could draw a line along the hull without removing the sides that we'd strapped on, and then we ran a circular saw along the length of the bottom panels and shaved off the extra. In short, we finished about 1/2 hour worth of work in about 2 and a half hours.

When we did our test fit last weekend, we saw that the bottom panels were about two inches too wide. So this week we (actually it was just Greg) built a jig so we could draw a line along the hull without removing the sides that we'd strapped on, and then we ran a circular saw along the length of the bottom panels and shaved off the extra. In short, we finished about 1/2 hour worth of work in about 2 and a half hours.
Thursday, July 21, 2005
Make Sure to Use Plenty of Epoxy
After we cut the excess length off of the rear transom, we decided to test the strength of the epoxy. I figured a drop test would be the best way to get a guage of how strong our gluing job was, and I was concerned with the results.
I dropped the excess from about five feet, to see how well it would hold up to a shock. The results weren't good. One of the four layers completely broke away. The second layer, as shown in this picture, split about 2/3 of the way through.
The moral of the story?? Use more glue than we did. In order to compensate for the lack of glue, we are going to reinforce the rear transom with several bronze screws. We're going to use bronze screws because they won't corrode over time.

I dropped the excess from about five feet, to see how well it would hold up to a shock. The results weren't good. One of the four layers completely broke away. The second layer, as shown in this picture, split about 2/3 of the way through.
The moral of the story?? Use more glue than we did. In order to compensate for the lack of glue, we are going to reinforce the rear transom with several bronze screws. We're going to use bronze screws because they won't corrode over time.
The Kit Isn't Perfect
In this photo, I'm holding the piece we cut from the rear transom. We cut this piece from both ends, so the kit cut the rear transom about 1" large on both ends.

What a FLAT Boat
This shot gives a good idea of how flat and square this boat is. Looking at it from the back, it almost looks like a cube.

Fits and Starts
After what seems like an eternity without doing anything on the boat, Greg and I finally got some time to work on it -- not much, but in such a major undertaking, every little bit counts. The biggest obstacle right now is the heat. Greg's garags isn't climate controlled, so with the latest heat wave we've been having, it's easily over 100 degrees in the garage until late in the evening. This, naturally, slows the progress.
On Saturday evening, we finally test-fitted the sides of the boat. Though the photo doesn't show it well, the bottom of the boat sticks out a little bit over the sides, so we're going to have to do a little trimming before we can stitch the hull together.

On Saturday evening, we finally test-fitted the sides of the boat. Though the photo doesn't show it well, the bottom of the boat sticks out a little bit over the sides, so we're going to have to do a little trimming before we can stitch the hull together.
Monday, June 27, 2005
Dammit! Two More Weeks of Lost Productivity
I was hoping that we'd be able to spend Saturday or Sunday working on the boat, and that we could spend a marathon day over the 4th of July weekend. But alas, that wasn't in the cards.
Greg was out of town Saturday and most of Sunday last weekend, and he's got plans next weekend too. By the time we get back to the boat work, we will have gone six weeks with out any significant progress. While our goal was to put in one good day per week, and we realized that we'd periodically miss a week here and there, I didn't expect that we'd go this long without any progress. I sure want to get back to work.
Greg was out of town Saturday and most of Sunday last weekend, and he's got plans next weekend too. By the time we get back to the boat work, we will have gone six weeks with out any significant progress. While our goal was to put in one good day per week, and we realized that we'd periodically miss a week here and there, I didn't expect that we'd go this long without any progress. I sure want to get back to work.
Saturday, June 25, 2005
Test-Fitting the Hull

When I said that it had been over three weeks since we'd accomplished anything on the boat, I wasn't completely accurate. I did go over to Greg's place last weekend, and we did the finishing touches on the frame, and test-fitted the bottom hull pieces. As you see in the photo, the hull pieces are too long. They're also a little too wide, and the rear transom is a little too wide, so we're going to have to do a little trimming before we can zip-tie the hull and start glassing the boat.
For a closer look at the overlaps I'm talking about, you can click here for a close-up of the front transom/hull overlap. This link will give a closer view of the overlap along the sides, and this link will give you a better idea of how far off the rear transom is.
Time Flies
Man, I can't believe it's been over three weeks since I've updated this blog. Even worse, I can't believe it's been that long since anything has been accomplished on the boat. The lack of progress will hopefully come to an end tomorrow though, as Greg and I get back into the swing of things. I'm a little disappointed that our progress has stalled, but it's because I've been out of town, so I'll cut myself a little slack... of course there's nothing that's prevented Greg from working on the boat while I've been gone, but that's another story.
I've already discussed the Boys' Trip we had over Memorial Day weekend, but I haven't mentioned my family vacation to the Buffalo, NY area. That trip was a blast, but it's a little off-topic for this blog. If you're interested in reading about it though, feel free to head on over to my other blog.
I've already discussed the Boys' Trip we had over Memorial Day weekend, but I haven't mentioned my family vacation to the Buffalo, NY area. That trip was a blast, but it's a little off-topic for this blog. If you're interested in reading about it though, feel free to head on over to my other blog.
Wednesday, June 01, 2005
A Well-Deserved Vacation
As I mentioned in last week's post, we took the week off so we could attend our annual guys week vacation. Click here to view the pictures. You can also see a short video of Dave surfing Gilmore's Mistake on the Wolf River, or a video of kids rafting the Wolf River.

Subscribe to:
Posts (Atom)
