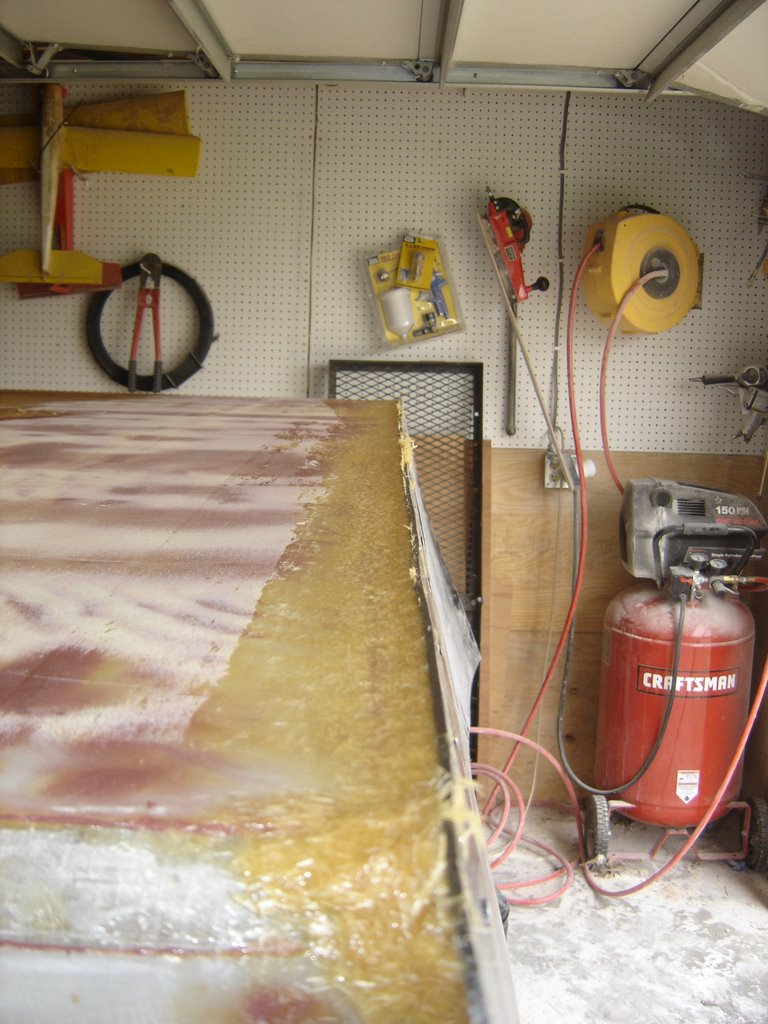
I figured it was about time for another actual picture of our project. This photo really doesn't do the boat justice, but I wanted to show you something. Next time, I'll take the shot from the bow, and you'll get a better idea of the boat's overall shape and progress. (This shot makes the boat look more like a giant brick than an actual watercraft.)
What you should notice in this picture is just how sharp we've cut the chines, how flat the boat is, and how patchy the boat looks now. (If you click on the picture, you will see a larger picture, complete with notes on the boat.)
Along the chines, you will see something that looks a little like mold. Greg did a fog coat of black spraypaint. The idea here is to do a very light hand sanding with a long sanding block. After this sanding, we will be able to identify the low spots. These low spots will be easily seen because the fog coat of black spraypaint will remain in the low areas, whereas the paint will have been sanded from the higher areas.
Feel free to click here if you'd like an idea of how things looked before we built up the chines.
Sunday, September 17, 2006


Sunday, August 27, 2006
A Good Day's Work
As I've mentioned time and time again, summer seems to slow Greg and me down on our quest for the perfect cabin cruiser. Today however, we made some great progress. We sanded down the hard chine on the port side and began the fine work with quick fair. It wasn't a long session time-wise, but we accomplished a lot. Additionally, we discussed ways to work smarter. The problem we've been running in to lately is that we can only put in an hour or two of work and then are required to wait for things to cure. Since the starboard side is about ready for flowcoating and priming, I brought up the idea of flowcoating and priming the boat in sections. This way, if there are areas that we need to revisit, we can be more effective in our work. Your thoughts??
Sunday, July 09, 2006
The Law of Diminishing Returns
Yes it's true... I've been horribly remiss in my postings lately. A small part of this is because we've been taking a slower pace lately, but mainly because there's really nothing to report.
Summer brings about a special set of challenges for our project. Part of the issue is that summertime brings about the opportunity for far more activity. Whether it's a chore such as mowing the lawn, a pleasure such as an afternoon drift down the river, or a picnic with the family, there's a lot more to do during the summer. This, of course, means a little less time to work on the boat.
The next challenge is the heat. We're building this boat in a non-air conditioned garage, and during this time of year, the heat is sometimes unbearable. Add in the fact that we're wearing tyvek suits, dust masks and safety glasses because we're sanding and fairing, and you should completely understand the lack of demonstrable progress on our project. I can only say "still sanding" so many times...
We've been sanding and fairing for about three months, but it seems like three years. Sanding and fairing is widely considered the most tedious, unrewarding phase of building a boat, and I honestly thought we were mentally prepared for this. I was wrong. In fact, I honestly believe that part of our slowed progress is based on burnout.
That said though, Greg is finally to a point where he's ready to say "good enough." To paraphrase a post from Wooden Boat Sailor, at some point the Law of Diminishing Returns kicks in. In the early stages, the sanding and fairing is essential, otherwise the boat looks and performs like absolute shit. As the process continues, there's a progressively smaller payoff for the same amount of work. Eventually you come to the point where the amount of work exceeds the amount of satisfaction you get from the work you put in. This is the "good enough" stage. Greg and I still have a little more work to do, but he's to the point where he realizes that any more work on the bottom of the hull is excessive. One of the sides is done, which leaves both transoms and the other side. If we haul ass, we should be ready to lay a coat of primer in about four to six weeks. Thank God! I'm soooooo ready to be finished with the sanding and fairing.
Summer brings about a special set of challenges for our project. Part of the issue is that summertime brings about the opportunity for far more activity. Whether it's a chore such as mowing the lawn, a pleasure such as an afternoon drift down the river, or a picnic with the family, there's a lot more to do during the summer. This, of course, means a little less time to work on the boat.
The next challenge is the heat. We're building this boat in a non-air conditioned garage, and during this time of year, the heat is sometimes unbearable. Add in the fact that we're wearing tyvek suits, dust masks and safety glasses because we're sanding and fairing, and you should completely understand the lack of demonstrable progress on our project. I can only say "still sanding" so many times...
We've been sanding and fairing for about three months, but it seems like three years. Sanding and fairing is widely considered the most tedious, unrewarding phase of building a boat, and I honestly thought we were mentally prepared for this. I was wrong. In fact, I honestly believe that part of our slowed progress is based on burnout.
That said though, Greg is finally to a point where he's ready to say "good enough." To paraphrase a post from Wooden Boat Sailor, at some point the Law of Diminishing Returns kicks in. In the early stages, the sanding and fairing is essential, otherwise the boat looks and performs like absolute shit. As the process continues, there's a progressively smaller payoff for the same amount of work. Eventually you come to the point where the amount of work exceeds the amount of satisfaction you get from the work you put in. This is the "good enough" stage. Greg and I still have a little more work to do, but he's to the point where he realizes that any more work on the bottom of the hull is excessive. One of the sides is done, which leaves both transoms and the other side. If we haul ass, we should be ready to lay a coat of primer in about four to six weeks. Thank God! I'm soooooo ready to be finished with the sanding and fairing.
Monday, June 05, 2006
Epi-blogue
Though this experiment met with one mishap after another, it's one that I wouldn't have missed for the world. Despite the fact that we spent two hours repairing our craft for every hour of sailing (or some semblence thereof) -- kind of like owning an Italian sportscar -- it's something I'd do again. This trip was a blast... or should I say "gust?"

Half Mast
The final insult was a break that we couldn't overcome. The mast broke. Greg fashioned the mast out of a 16 foot aluminum flagpole. Though it was stressed far beyond anything it was engineered for, it held up for two days under strong winds. In the end though, mother nature's force was too much for the mast, and it snapped in the middle. The ironic part is that we were sailing for shore.
Greg wanted one last day of experimentation and sailing, and I wasn't about to let him go out in the boat alone... we'd both end up stranded that way. He'd be stuck in the water, and I'd be stuck on the island. So we shoved off one last time and tried to tack upwind, to no avail. We pulled the sail down, and as Greg frantically attempted repairs, the wind pushed us slowly downwind from our campsite. We were approximately a quarter mile downwind, when I announced that it was time to bring our experiment to a close.
I suggested using the wind to our advantage by bringing the sail up one last time and harnessing the wind's power to at least get us to shore, allowing us to paddle back up to our campsite in the island's wind shadow, thus fighting the wind less.
We hoisted the sail, flew for five feet or so, and heard that final **SNAP**. We looked up just in time to see the sail and mast tumbling. It was the final defeat in our experiment.

Greg wanted one last day of experimentation and sailing, and I wasn't about to let him go out in the boat alone... we'd both end up stranded that way. He'd be stuck in the water, and I'd be stuck on the island. So we shoved off one last time and tried to tack upwind, to no avail. We pulled the sail down, and as Greg frantically attempted repairs, the wind pushed us slowly downwind from our campsite. We were approximately a quarter mile downwind, when I announced that it was time to bring our experiment to a close.
I suggested using the wind to our advantage by bringing the sail up one last time and harnessing the wind's power to at least get us to shore, allowing us to paddle back up to our campsite in the island's wind shadow, thus fighting the wind less.
We hoisted the sail, flew for five feet or so, and heard that final **SNAP**. We looked up just in time to see the sail and mast tumbling. It was the final defeat in our experiment.
Broken Mast Support
Take a little too much wind, add a makeshift watercraft, and throw in a couple of inexperienced sailors... what do you get? A recipe for a disastrously humorous adventure.
Our next malfunction was a broken mast support. The mast support consisted of a wooden dowel, a couple of turnbuckles for adjustibility, and more hose clamps and bolts to hold the supports in place.
One particularly strong gust of wind ripped the turnbuckle from the dowel. We repaired the break with glue, but ended up going with another mast support made from a tree branch, lashed in place with ropes and ratchet straps.

Our next malfunction was a broken mast support. The mast support consisted of a wooden dowel, a couple of turnbuckles for adjustibility, and more hose clamps and bolts to hold the supports in place.
One particularly strong gust of wind ripped the turnbuckle from the dowel. We repaired the break with glue, but ended up going with another mast support made from a tree branch, lashed in place with ropes and ratchet straps.
Rudder Problems
The next problem we encountered was a rudder problem. We used a canoe paddle as the rudder, which was bolted to the catamaran frame using something that Greg fashioned. This mount broke, and we ended up having to ratchet strap the canoe paddle to the frame. Once this was done, the rudder didn't function quite as efficiently, so I periodically resorted to using two canoe paddles to achieve my objective.

Repaired Leeboard
After repairing the leeboard, we again tested our craft for seaworthiness. As you can see in this picture, the repair was fashioned out of a steel brace, hose clamps and a log provided by mother nature. Greg sunk a lag bolt in to the log. We tested things out, and the repair held, but there was yet another problem. By repairing the leeboard in this fashion, the board didn't sit as deeply in the water, effectively eliminating a portion of our ability to tack. We were able to tack one way against the wind, but not the other.
As you can imagine, this necessitated another long arduous paddle back to shore. Fortunately, we were picked up by a pair of boaters who towed our crippled craft back to our campsite for still more repairs.

As you can imagine, this necessitated another long arduous paddle back to shore. Fortunately, we were picked up by a pair of boaters who towed our crippled craft back to our campsite for still more repairs.
Saturday, June 03, 2006
Engineering Problems A-Plenty
As I mentioned yesterday, our first trip was completely uneventful. This is mainly because there was just enough wind to get us from the landing to our campsite, so we cruised to the island, set up camp, ate, and hoped for more wind the following day. Our wish was fulfilled.
After a hearty breakfast of beer and eggs, Greg and I were anxious to continue our experiment and to test our skill as sailors. We did a quick sail in the water immediately next to our camp site, and were soon satisfied that our boat and our skills were solid enough to venture further into the open water.
Being novice sailors, it took us a little bit of time and experimentation to learn the ropes, but we took great pleasure in the new experience... until we heart that first **CRACK**. I don't remember whether it was caused by shallow water, or by actual stress, but our leeboard mount broke. As this picture shows, the leeboard itself held up to the stress, but the frame wasn't quite as strong, flexible, or whatever.
Despite our hobbled watercraft, we were able to limp back to our campsite, which was upwind from us when the malfunction occurred, and fortunately Greg brought plenty of material for repairs. He pulled the leeboard mount and had soon fashioned a repair of glue and screws. On the downside, we had to wait for the glue to cure, so our sailing was finished for the day.
Stay tuned for our continued misadventures.

After a hearty breakfast of beer and eggs, Greg and I were anxious to continue our experiment and to test our skill as sailors. We did a quick sail in the water immediately next to our camp site, and were soon satisfied that our boat and our skills were solid enough to venture further into the open water.
Being novice sailors, it took us a little bit of time and experimentation to learn the ropes, but we took great pleasure in the new experience... until we heart that first **CRACK**. I don't remember whether it was caused by shallow water, or by actual stress, but our leeboard mount broke. As this picture shows, the leeboard itself held up to the stress, but the frame wasn't quite as strong, flexible, or whatever.
Despite our hobbled watercraft, we were able to limp back to our campsite, which was upwind from us when the malfunction occurred, and fortunately Greg brought plenty of material for repairs. He pulled the leeboard mount and had soon fashioned a repair of glue and screws. On the downside, we had to wait for the glue to cure, so our sailing was finished for the day.
Stay tuned for our continued misadventures.
Friday, June 02, 2006
How We Did It
Our construction process was precise yet simple. Engineer-boy took the measurements and did the conversion mainly with things he already had laying around his garage... plywood, 2x4s, wooden dowels, ratchet straps, hose clamps, lag bolts and so forth. About the only parts he needed to buy were the flagpole that we used for the mast, and the tarp that he cut to the shape of a sail.
When we got to the reservoir, we spent the first two hours or so assembling the catamaran. By the time we finished the construction, got to camp, set up the tent and ate, it was time to go to bed. Additionally, the maiden voyage from the landing to the island occurred on a day with almost no wind. We were able to make our way to the island, but it was slow going. Our real test would have to wait for another day.

When we got to the reservoir, we spent the first two hours or so assembling the catamaran. By the time we finished the construction, got to camp, set up the tent and ate, it was time to go to bed. Additionally, the maiden voyage from the landing to the island occurred on a day with almost no wind. We were able to make our way to the island, but it was slow going. Our real test would have to wait for another day.
Thursday, June 01, 2006
Look What We Did to Our Nice Canoes
Per our tradition, we took our boys' trip over Memorial Day weekend. For several years we have been travelling staying in Nicolette Forest in northease Wisconsin, for a few days of whitewater kayaking. This year, we decided to get back to our roots and do some canoeing. Greg and I took things a step further, and rigged up the Nice Canoes we built a couple of years ago as a makeshift catamaran. Greg, being engineer-boy, calculated the dimensions, measured the sail, and determined where to put the various parts. It worked surprisingly well -- for one day. The boat was structurally sound, but anything that directly related to the sailing aspect was woefully under-engineered. Stay tuned for the complete story... it's quite a ride.

Saturday, May 20, 2006
A Brief Diversion
You may have noticed a lack of recent posts about our boat project, and if you think it's because we haven't done anything lately, you're right. You see, it's almost time for our annual boyz trip pilgrimage. Every year over Memorial Day, Greg, two of our friends from high school and I go on an extended trip. The trips have varied tremendously over the years... sometimes we do long, self-contained downriver canoe trips, sometimes we do whitewater kayaking, occasionally more than the "core four" of us will go. Our trips have varied from three days to a week, and we have hit too many rivers to count. We started out taking these trips over Labor Day weekend, but changed to Memorial Day a few years back when we figured out that the water levels are generally higher this time of year.
This year, we will be travelling to
If you’re interested in some of the history and stories from our various trips, here are a few links for you to check out…
From earlier posts in this blog:
How it all Began; A Quick Sidenote:
A Well-Deserved Vacation
Pictures of the Canoes
From posts on my other blog:
Commemorating a Practical Joke
Saturday, April 15, 2006
Sanding and Fairing and Building the Edges
 Greg and I haven't forgotten about you, this blog, or our project. It's just that we haven't recently hit any milestones worth blogging about. As I mentioned in some of my recent postings, the part we're on now is very long and tedious... not much worthy of a blog entry. Despite my lack of posting though, we have made significant progress, and it's very close to the rate that I expected. This is largely due to Greg's work.
My family and I went to California for vacation recently, which prevented me from assisting Greg for two weeks straight. In all honesty, I suspected that very little would be done during my absence. (This is partially because much of what we've done to date is highly expedited by having two people working, and partially because I realize that I help keep Greg motivated.) But when I got back home, I was pleasantly surprised to find that Greg had made significant progress during my absence. While I was gone, Greg enlisted the assistance of our mutual friend Dan. Dan, thanks for your help while I was gone. I appreciate it, and I know Greg appreciates it.
As you can see in the first photo, Greg and Dan made great progress in filling the bottom of the boat. It's very close to being finished.
 Greg also made a lot of progress in rebuilding the hard edges of the boat. Remember, this boat is designed to have a planing hull, so a perfectly flat bottom and very hard chines are essential in order to have this boat perform as expected at planing speeds.
In the picture to the right, you will see how we made the chines with relatively little work. Greg screwed thick sheets of plastic to the hull, as shown in this picture. This gave us (when I say "us," I'm including Dan, because he was part of this particular process; he also provided us with the plastic.) a fairly straight, and very sturdy platform with which to work. We wedged epoxy thickened with wood flour and fiberglass particles into the space between the plasic, going slightly higher than the bottom of the hull. This way, we were sanding down, instead of requiring a second fill coat.
 In this picture, you will notice the applied thickened epoxy. After the epoxy dries, we remove the sheets of plastic, and voila, a sturdy chine, ready for sanding.
 This shot will give you a basic picture of what the chines look like after the epoxy sets and the plastic is removed. What you're looking at is the starboard side. You will notice that the chines are not built up throughout the whole starboard side. This is because of the limited plastic available. It will require a second session to finish the side. You will also notice that we (again, "we" includes Dan) have been sanding and fairing along the entire bottom of the hull.
 This final picture is taken from the bow, starboard corner. You will notice that Greg has also filled the front transom area, and the front bottom area, to compensate for the three-to-six layers of fiberglass. You will also notice the fair amount of fairing done on the bottom, and the hard chine. Like I've said, it's not that we haven't been working, and it's not that we've forgotten about you. It's mainly that we're at a relatively tedious section of the project, and there's not a lot to report. After all, how many times can I say "Yep, we're still sanding" and keep you all interested?
Until next time...
Oh yeah, you may have noticed that the boat has several different colors of filler. This is because Greg is utilizing a combination of what's cheapest and what works best for sanding and fairing in a given area of the boat.
Sunday, March 12, 2006
The Good and the Bad and the Good
The fairing and sanding continues. Greg read about a really neat idea that will likely save us countless hours of eyeballing, and in the end, provide us with a significantly more accurate finished product...
In my last entry, you saw the level that showed approximately how much filling we need to do. Well, Greg decided to wrap that level in plastic, run a strip of filler under where the level was, and then essentially mash the level into the filler and let things dry. After the filler dried, he removed the level, shaved down the excess epoxy and voila, he had a "rail" that gave us a guide for how much filler we need to use. By running a second "rail" down the center, and a third one down the other side, we had a rail system built, which will allow us to roll out a single, thick, accurate layer of filler and dramatically reduce the amount of sanding and fairing we will need to do. A stroke of genius!
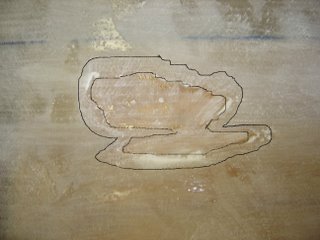 On the downside, when sanding yesterday, we came across a big spot that was starved for epoxy, as shown (and outlined) in the picture to the right. This is an area that's come back to haunt us from way-back-when. The area is approximately 4"X3." It's nothing that can't be overcome, but is a little frustrating.
We have yet to decide how to address the issue, but Greg has two ideas... one is to use fiberglass filler and epoxy, the other is to use glass micro-filler and epoxy. I've found one or two other spots like this, but they're small, in non-structural areas, and easy to fix.
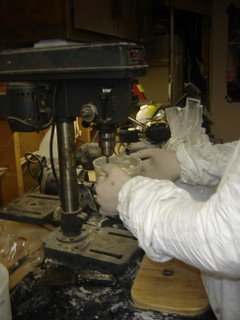 Here's another small stroke of genius Greg ran across...
-Are you tired of constantly stirring epoxy and/or thickener?
-Are you working by yourself and would like to save a little time?
-Are you working with fast hardener, and tired of worrying if it's going to kick too quickly?
If any of these problems apply to you, then you should try what Greg's doing in this picture to the right. Use a drill (or drill press) and a paint-stirring bit to do the work for you. It's quicker and easier. Just remember to take measures to protect your drill. It would really suck if you ended ruining your drill because it got all gummed up with epoxy.
In my last entry, you saw the level that showed approximately how much filling we need to do. Well, Greg decided to wrap that level in plastic, run a strip of filler under where the level was, and then essentially mash the level into the filler and let things dry. After the filler dried, he removed the level, shaved down the excess epoxy and voila, he had a "rail" that gave us a guide for how much filler we need to use. By running a second "rail" down the center, and a third one down the other side, we had a rail system built, which will allow us to roll out a single, thick, accurate layer of filler and dramatically reduce the amount of sanding and fairing we will need to do. A stroke of genius!
 On the downside, when sanding yesterday, we came across a big spot that was starved for epoxy, as shown (and outlined) in the picture to the right. This is an area that's come back to haunt us from way-back-when. The area is approximately 4"X3." It's nothing that can't be overcome, but is a little frustrating.
We have yet to decide how to address the issue, but Greg has two ideas... one is to use fiberglass filler and epoxy, the other is to use glass micro-filler and epoxy. I've found one or two other spots like this, but they're small, in non-structural areas, and easy to fix.
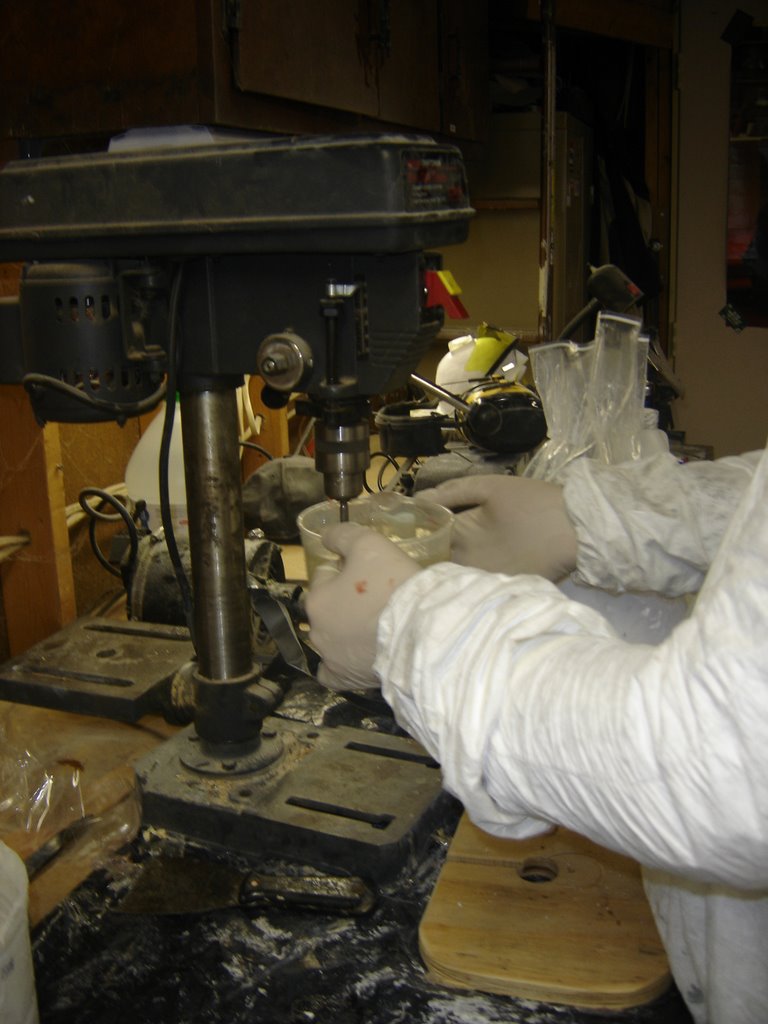 Here's another small stroke of genius Greg ran across...
-Are you tired of constantly stirring epoxy and/or thickener?
-Are you working by yourself and would like to save a little time?
-Are you working with fast hardener, and tired of worrying if it's going to kick too quickly?
If any of these problems apply to you, then you should try what Greg's doing in this picture to the right. Use a drill (or drill press) and a paint-stirring bit to do the work for you. It's quicker and easier. Just remember to take measures to protect your drill. It would really suck if you ended ruining your drill because it got all gummed up with epoxy.
Sunday, February 19, 2006
Time to Fair
Greg and I started the long task of filling in the low spots. This pic is a "before" shot that will show you how much area we have to fill.
You may also be interested in seeing me do another household project using epoxy.

You may also be interested in seeing me do another household project using epoxy.
Sunday, January 29, 2006
The Outside of the Hull is Glassed!
We reached another major milestone yesterday... we finished glassing the exterior of the hull. Now we're on to the long task of fairing and sanding. Based on our current pace, I expect this to take about three months.
Sunday, January 22, 2006
Glassed Rear Transom

We've gotten pretty good at laying glass, and have devised a method that lets us lay two layers at once. The first time we did it was a little tough, but through a little trial and error, we've got it down to a science. By doing two layers at once we are saving time and I think we'll have a stronger boat, because laying two layers at once will give us a single chemical bond in addition to the physical bond. It also seems to cut down on the amount of sanding we need to do.

Our double layer method consists of measuring the glass cloth and laying them in place, and laying a coat of epoxy thick enough to saturate both layers of glass. The horizontal surfaces are very easy, but the vertical surfaces are a little more tricky. We've found that it's best to use a roller to work a thick layer of epoxy into the glass at the top, and then slowly squeegee the excess down the side. Make sure to do this very slowly, so the epoxy has a chance to saturate the cloth as you go down. If the epoxy is rolling down the surface as you use the squeegee, you're moving too quickly.
One note: I do NOT recommend doing this double-layer method unless you've got two people for the task.
Saturday, January 14, 2006
I dropped by Andrew Lucking's site today. Andrew is building a VG23 sailboat, but has had to cease construction for the winter. In the meantime, Andrew has found a few cool links that you may find interesting...
Peter Gron is building an Arctic Tern Sloop that promises to be a beautiful lady when she's done. Peter came up with an brilliant way to make the stitches tight at the bow, but I'll let you read his web site and find it for yourself. He's also got great pictures of the jig he built for rolling the boat.
---Blatant lifted from Andrew's page, so I don't have to re-type---
I didn’t mean to but… - Tim Zim is in the midst of converting a fishing trawler into a liveaboard. Tim complains about busting rust the way I complain about sanding. And his “Lady Jane” is 90+ feet!
Ceilydh Under Construction - Evan Gatehouse and family are reconstructing a Woods Meander 40′ catamaran. Any boat project that begins with a chainsaw is okay in my books.
Waterlogged: living on a wooden ship - These folks are living aboard the MV Bowie, a 136 foot former WW II US Navy subchaser, as they renovate her. Something about life on a huge old wooden ship with a hot tub on her stern really appeals to me.
---End Blatantly Plagarized Section---
While you cruise through these sites (hopefully getting ideas and staying motivated about your own project), be assured that Greg and I are still sanding and laying fiberglass on the hull.
Peter Gron is building an Arctic Tern Sloop that promises to be a beautiful lady when she's done. Peter came up with an brilliant way to make the stitches tight at the bow, but I'll let you read his web site and find it for yourself. He's also got great pictures of the jig he built for rolling the boat.
---Blatant lifted from Andrew's page, so I don't have to re-type---
I didn’t mean to but… - Tim Zim is in the midst of converting a fishing trawler into a liveaboard. Tim complains about busting rust the way I complain about sanding. And his “Lady Jane” is 90+ feet!
Ceilydh Under Construction - Evan Gatehouse and family are reconstructing a Woods Meander 40′ catamaran. Any boat project that begins with a chainsaw is okay in my books.
Waterlogged: living on a wooden ship - These folks are living aboard the MV Bowie, a 136 foot former WW II US Navy subchaser, as they renovate her. Something about life on a huge old wooden ship with a hot tub on her stern really appeals to me.
---End Blatantly Plagarized Section---
While you cruise through these sites (hopefully getting ideas and staying motivated about your own project), be assured that Greg and I are still sanding and laying fiberglass on the hull.
Saturday, January 07, 2006
Fiberglass Filler
Here's a picture of the fiberglass-filled patch. You see that Greg used epoxy filled with fiberglass particles, which he used to fill the areas he cut out, and blended in with the glass cloth. The strength is solid, and it will undoubtedly work better than the original plan of injecting epoxy into small holes. It's a little more work, but we both agree that it's worth it.

We Re-Interrupt this Program...
For an update on my shower repair. You may notice that my last update on this was in Mid-December. Since then I have had precious little time to work on the shower, and when I did work on it, the progress was slower for various reasons...
The patch job still isn't re-grouted and re-sealed, but that'll come in the next couple of days. And of course, it's not perfect, but it's designed to be a semi-permanent patch job, not a total reworking.

The patch job still isn't re-grouted and re-sealed, but that'll come in the next couple of days. And of course, it's not perfect, but it's designed to be a semi-permanent patch job, not a total reworking.
Monday, December 26, 2005
Back to our Regularly Scheduled Program
We laid some more glass yesterday, but I'm going to digress a bit.
You may remember in an earlier post that we had a couple of spots where the fiberglass didn't adhere to the plywood. Our initial plan was to drill small holes in these areas and fill them with epoxy. Greg changed his mind. Instead, he cut out these areas with a knife, and filled it with a mixture of epoxy and fiberglass filler. My camera batteries were dead, so I don't have any pics of this, but I will attempt to get some pics posted soon.
After the fiberglass filling, we did a little last-minute sanding, and laid fiberglass on one side. We've now got about two-thirds of the exterior completely fiberglassed. We still have one side, and both transoms to do, but that should go relatively quick. Of course I'll post pictures.
You may remember in an earlier post that we had a couple of spots where the fiberglass didn't adhere to the plywood. Our initial plan was to drill small holes in these areas and fill them with epoxy. Greg changed his mind. Instead, he cut out these areas with a knife, and filled it with a mixture of epoxy and fiberglass filler. My camera batteries were dead, so I don't have any pics of this, but I will attempt to get some pics posted soon.
After the fiberglass filling, we did a little last-minute sanding, and laid fiberglass on one side. We've now got about two-thirds of the exterior completely fiberglassed. We still have one side, and both transoms to do, but that should go relatively quick. Of course I'll post pictures.
Saturday, December 17, 2005
Other Uses for Epoxy and Plywood - Part IV
In this photo, you see that I've done part of the bottom, or side, section. I was fortunate that this section came off in one large sheet, so I didn't have to re-lay individual tiles. The hardest part of re-laying the tiles comes next. Wish me luck.
By the way, if you're interested, you can also see my other home improvement project on my other blog. I figured that it was more appropriate to post this project here, since it so heavily utilizes plywood and epoxy.

By the way, if you're interested, you can also see my other home improvement project on my other blog. I figured that it was more appropriate to post this project here, since it so heavily utilizes plywood and epoxy.
Other Uses for Epoxy and Plywood - Part III
You can see that I've used thickened epoxy and laid the tiles on the top section. It's not pretty, but it's functional - and waterproof. I plan to drill out the epoxy between the tiles and re-grout. That will make things less ugly.

Other Uses for Epoxy and Plywood - Part II
In this picture, you see that I have installed the scrap plywood. the plyowood has been sealed with epoxy, so it should stay waterproof for until I truly remodel this bathroom. I've screwed it all into place with waterproof screws, and you may see that I've test-fitted a block of tiles.

Thursday, December 08, 2005
Other Uses for Epoxy and Plywood
 By now, we're all familiar with using epoxy and plywood for building boats. But have you considered using plywood and epoxy for other jobs around the house? The previous owner of my house installed a tile shower, and used plain plain 2x4's and plywood for this water-catching lip. Over the years, water has gotten in here, and eventually it rotted away the plywood and the wood.
I'm not going to the trouble of completely ripping this out and starting from scratch, but I am going to repair it so it stays put until I'm ready to completely overhaul this bathroom. Enter the epoxy and plywood...
During the course of the next couple of weeks, I am going to epoxy the remaining wood, in an attempt to prevent any further deterioration. I will cut some scrap plywood to size and lay a protective layer of epoxy over that as well, which will waterproof the entire base. Finally, I will use thickened epoxy to stick the tiles back into place. Why epoxy instead of cement? Because I have the epoxy and plywood available. I'd have to go out and buy the cement. The only reason NOT to use wood is because of the rotting factor. By coating it all with epoxy, I have removed the potential for rotting.
Overall View
As you can see, our work paid off in the end. For the most part, it looks really good, and you can't really tell where we ran out of epoxy.
Next time we'll lay epoxy on the sides, then it's time to start fairing and sanding.

Next time we'll lay epoxy on the sides, then it's time to start fairing and sanding.
Drilling Small Holes
We're overcoming our problem by drilling small holes where the epoxy bubbles are. We will then inject epoxy into the holes and weight down the area, so the fit is as tight as possible in the end.

The Journey Continues
You may remember from our last couple of entries that we ran out of epoxy. In order to overcome this potentially disasterous problem, we heated the cured epoxy with a heat gun, and applied epoxy to the rest of the boat.
This picture shows that, for the most part, our approach worked incredibly well. However, also shown in the picture, we had a few spots that were completely starved and didn't adhere to the hull at all.
How did we overcome this problem??? Read on and find out.

This picture shows that, for the most part, our approach worked incredibly well. However, also shown in the picture, we had a few spots that were completely starved and didn't adhere to the hull at all.
How did we overcome this problem??? Read on and find out.
Tuesday, November 29, 2005
Heating Fresh Epoxy
There were a couple of areas on the rear transom where the glass didn't lay down to our liking. Greg decided to see if heating the epoxy in this area would work. After a few minutes, we discovered that the epoxy got very thin and dripped a lot. This tended to starve the fiberglass, didn't help the fiberglass adhere to the plywood at all, and the epoxy that remained in the fiberglass had dried enough to touch after a mere five additional minutes.
In short, I don't recommend using a heat gun on uncured epoxy. It's a good way to give yourself a second chance on cured epoxy though. In fact, I'd call it a sheer stroke of genius on Greg's part.

In short, I don't recommend using a heat gun on uncured epoxy. It's a good way to give yourself a second chance on cured epoxy though. In fact, I'd call it a sheer stroke of genius on Greg's part.
Glassed Bottom
The rest of the bottom has been glassed. As I write today's entry, we're waiting for the epoxy to completely cure. This weekend, we'll touch up any areas that need it, do a little sanding, and lay glass on the sides and transoms as needed.

Weighting the Transition Area
To help ensure a good bond in the area where we ran out of epoxy, we laid a slightly thicker layer of epoxy, then laid a sheet of plastic over the transition area, laid a piece of plywood over all of that, and weighted it down. From the transition point on, we epoxied as normal.

Quick Heating and Quick Cooling
As mentioned in the last entry, we used a heat gun to heat up the stiff fiberglass, and soften the epoxy. Immediately upon softening, we laid a cool metal weight on top of the newly-softened fiberglass. This helped the fiberglass lay flat as it should.
As we went, we learned that we could run the heat gun in front of the weight, which would heat the fiberglass and epoxy, and we could immediately slide a weight behind the heated area. this would ensure the area would lay flat. I've gotta say, it was a pretty clever trick.

As we went, we learned that we could run the heat gun in front of the weight, which would heat the fiberglass and epoxy, and we could immediately slide a weight behind the heated area. this would ensure the area would lay flat. I've gotta say, it was a pretty clever trick.
An Answer to our Glassing Problem
We ("we" being Greg for the most part) thought about possible solutions for our problem on how to get the partially-wetted fiberglass to properly adhere to the hull. After a week or so, Greg found the answer. We used a heat gun and softened the epoxy in the areas where the fiberglass was bubbled up from the hull.

Friday, November 18, 2005
A Stroke of Luck?
Here's the answer from bateau about our epoxy problem.
---Begin Original Text---
If you can get it to wet out, there should not be any problems. The larger white areas are going to be easy, its the spots that have been half way wetted out that will be diffucult to make right - you will have to really work the epoxy into the glass to wet out the dry fibers.
---End Original Text---
They asked for some close-up pics of the area where we had run out of epoxy, (here are links to the pictures 1 2 3 4 5 6 7) they talked among themselves, and the concensus was that we could probably do it, but it would take work.
Note: These pics are very large. They'll take a minute or so with broadband. If you're using dial-up, make lunch while you wait for the downloads.
Hey, I can handle a little extra work. I was concerned that we'd have to cut the cloth, toss out the stuff that wasn't epoxied thoroughly, sand down the transition area, and relay the back section; which would have cost us several extra hours of work and about $50 to $100 in extra fiberglass.
Greg came to the conclusion that we really did have enough epoxy for the job, but we used a grout float instead of a squeegee when we applied the epoxy. After looking at the boat, there's little doubt in my mind that he's right. I agreed with his assessment when I saw how much epoxy had run down the side of the boat. Using a squeegee was easier and faster, but it cost us extra in the long run. Greg had to buy more epoxy than originally anticipated, and it's going to cost us a little extra work. I wouldn't disrecommend using a grout float for the big jobs; in fact I'd still recommend it. But I would also highly suggest that you double your estimate when you consider how much epoxy you'll need for the job. The worst that will happen is that you end up with extra epoxy, which can be used on your next job.
As usual, I'll take more pictures (heck, maybe I'll do a video... we're about due for one) and update you on the progress.
---Begin Original Text---
If you can get it to wet out, there should not be any problems. The larger white areas are going to be easy, its the spots that have been half way wetted out that will be diffucult to make right - you will have to really work the epoxy into the glass to wet out the dry fibers.
---End Original Text---
They asked for some close-up pics of the area where we had run out of epoxy, (here are links to the pictures 1 2 3 4 5 6 7) they talked among themselves, and the concensus was that we could probably do it, but it would take work.
Note: These pics are very large. They'll take a minute or so with broadband. If you're using dial-up, make lunch while you wait for the downloads.
Hey, I can handle a little extra work. I was concerned that we'd have to cut the cloth, toss out the stuff that wasn't epoxied thoroughly, sand down the transition area, and relay the back section; which would have cost us several extra hours of work and about $50 to $100 in extra fiberglass.
Greg came to the conclusion that we really did have enough epoxy for the job, but we used a grout float instead of a squeegee when we applied the epoxy. After looking at the boat, there's little doubt in my mind that he's right. I agreed with his assessment when I saw how much epoxy had run down the side of the boat. Using a squeegee was easier and faster, but it cost us extra in the long run. Greg had to buy more epoxy than originally anticipated, and it's going to cost us a little extra work. I wouldn't disrecommend using a grout float for the big jobs; in fact I'd still recommend it. But I would also highly suggest that you double your estimate when you consider how much epoxy you'll need for the job. The worst that will happen is that you end up with extra epoxy, which can be used on your next job.
As usual, I'll take more pictures (heck, maybe I'll do a video... we're about due for one) and update you on the progress.
Sunday, November 13, 2005
A Significant Setback on our way to a Major Milestone
We ran out of epoxy. Between applying the base coat to the bare wood, and the bonding coat that bonds the glass cloth to the hull, we went through well over three gallons of epoxy.
This could have some major unintended side effects for us, but I'm not sure yet.
The front half of the boat is fine. I'm not so sure about the back half. Greg thinks that we can just get more epoxy and continue where we left off. I'm concerned that we'll need to rip up the cloth that didn't get bonded and reapply the cloth. Here's what I'm thinking...
We've got the base layer of epoxy applied to the bare wood. It's also ever-so-slightly bonding the fiberglass cloth to the hull. But I'm concerned that it's not quite right. I'm going to ask Jacques over at the boat forum and get his input. I'll let you know when I get the answer.

This could have some major unintended side effects for us, but I'm not sure yet.
The front half of the boat is fine. I'm not so sure about the back half. Greg thinks that we can just get more epoxy and continue where we left off. I'm concerned that we'll need to rip up the cloth that didn't get bonded and reapply the cloth. Here's what I'm thinking...
We've got the base layer of epoxy applied to the bare wood. It's also ever-so-slightly bonding the fiberglass cloth to the hull. But I'm concerned that it's not quite right. I'm going to ask Jacques over at the boat forum and get his input. I'll let you know when I get the answer.
Glassing the Hull
This picture shows the front half glassed and epoxied. If you look closely at the picture, you can see the line where there's no top layer of epoxy.

Prepped Hull
The hull is now prepped. A base coat of epoxy has been applied to the entire exterior of the hull. Isn't it shiny?

Prepping the Hull
Yesterday we started the process of laying fiberglass cloth on the hull. Here's a picture of me rolling a base coat of epoxy onto the bare wood of the hull.

Finished Taping the Seams
Greg got the front and rear transom joints taped. The corners have six layers of fiberglass on them. They should be able to withstand a direct blast from a nuclear warhead.

Sunday, November 06, 2005
Another Minor Milestone
We haven't done much the last couple of weeks, because my wife and I went on our honeymoon. Greg did a little work while I was gone, but not a whole lot... mainly a few last-minute things before doing what we did last night... laying tape!
That's right, we laid tape on the three long seams. Greg said that he'd to the transoms today, so we have not only a good physical bond, but a good chemical bond with the epoxy as well.

That's right, we laid tape on the three long seams. Greg said that he'd to the transoms today, so we have not only a good physical bond, but a good chemical bond with the epoxy as well.
Tuesday, October 18, 2005
Resolution to the Errors We're Experiencing
We received an answer that thoroughly answers the questions regarding the fit problems we've encountered while assembling the hull. The short answer is that it's a combination of problems with how the kit was cut at the factory, and assembly error. If you're interested in the long version, I'm attaching the response from Jacques, one of the admins at www.bateau.com
---begin original message---
Here are Ryan's conclusion[s] and I agree with them. We have looked many times at this and suspected a problem if parts were cut from the nesting drawing. We found only discrepancy . Ryan's notes are in italic. My comments are in blue.
-----------------------
"The aft pieces of the hull bottom were too wide where they meet the middle pieces of the hull bottom. I laid out the plan spec dimensions on these pieces and had to cut off slivers approximately 5/8" wide, tapering down to 0", by 20" long, in order for these pieces to meet the plan specs and to get them to butt properly to the middle bottom hull sections. The cuts were on the outside of the pieces."
---->I have no clue about this. The nesting matches the dimensions.
That must have been a CNC machine problem. Fortunately, it was too large and easy to correct.
2) The aft and bow transoms were mounted on the building frame, at the distances and angles specified in the plans. A laser was used to precisely align everything. When the glued and assembled stringers were put in place, it was clear that they were about 3 inches shorter than the distance between the transoms. Part of this distance (1/2") can be explained by the fact that I did not account for the front cabin bulkhead fitting between the aft and bow portions of the stringers, as I had glued them up as one contiguous unit (instead of installing the bow portion of the stringers later, as indicated in the on-line building tutorial). However, having to recess the stringers 1/2 way into the transoms adds 9/16" for the bow transom and 1" for the aft transom (which is 2" thick for large motor usage). This adds up to: 3" - 1/2" + 9/16" + 1" = approximately 4 inches that the stringers were short. I do not recall what the exact measurements are, and I did not try and crawl under the boat to take them again. Thus, I cannot say whether this is a plan or kit error."
---->the kit: The transom that was in the nesting was too big. It was about 1-7/8" too big. The stringer tips in the nesting were about 1" too short.
The CNC file for those parts was taken from the nesting drawing but the nesting drawing is not to scale!
You corrected properly.
"This problem was corrected by moving the bow transom aft the proper distance so that the stringers would fit right. I knew this could change the way the bottom panels fit, so when we put the aft 3 building molds in, we reduced the distance between each of them a small amount. This was done because the bottom is much flatter in this area and I knew it would affect the shape/fit of the panels less than adjusting each mold position or just the front ones."
--->Once they do this.....the frames won't fit right.
That looks like an assembly mistake you made but again, you corrected it properly.
"Some of the kit frames were not wide enough. For example: According to the plans, Frame F should be 90-1/4" wide. The actual measurement is 88-1/4". Frame E should be 92-3/4", and the actual measurement is 90-3/4"."
---->The nesting matched the station dimensions....so I don't know about this.
Me neither . . . were those frames marked correctly?
"Several of the kit pieces that were supposed to be 3/8" plywood were actually 1/2". I have been able to work around this without too much problem and the small amount of extra weight should not affect the performance."
---->Not sure about this one either.
I discussed this with Eric. he asked permission to use 1/2" instead of 3/8 for cutting reasons. I checked and gave the OK, it has no effect on weigth (maybe 5 lbs total!) and can only be better question of strength.
-----------------------
Conclusion, it looks like there were some problems with the kit, some I understand, others not but you solved the problems. Sorry for those cutting mistakes. Email when you need paint or other supplies, we'll do something special.
All the dimensions on the plans are correct, it's a kit problem that does not affect those building from the plans. Eric and I have discussed this. In 95% of the cases, despite what we say on the plans (NTS = Not To Scale), our plans are to scale. Those parts were an exception. Right now, we do not cut kits from the nesting drawing anymore.
_________________
Jacques Mertens
---end original message---
My personal opinion on the whole deal...
The root of the problems were based on errors in the kit. The problem was exacerbated when we adjusted our assembly process upon encountering kit errors, resulting in a chain reaction of minor, correctable issues.
Jacques and crew have been instrumental in figuring out the root of the problem, and there's no doubt in my mind that they'll work with the kit manufacturer to ensure this doesn't happen again. Additionally, they appear to genuinely care about customer satisfaction, as evidenced by their promise to "do something special" next time we order supplies. Despite the fact that we've experienced these minor setbacks, I have been satisfied in my dealings with these guys, and I would freely recommend bateau for anyone who is building a houseboat (or any other type of boat.) "If you're building a houseboat, go to www.bateau.com for the plans, kit and supplies."
By the way, if you do end up ordering from bateau as a result of reading this blog, tell 'em that OzzyC sent you.
---begin original message---
Here are Ryan's conclusion[s] and I agree with them. We have looked many times at this and suspected a problem if parts were cut from the nesting drawing. We found only discrepancy . Ryan's notes are in italic. My comments are in blue.
-----------------------
"The aft pieces of the hull bottom were too wide where they meet the middle pieces of the hull bottom. I laid out the plan spec dimensions on these pieces and had to cut off slivers approximately 5/8" wide, tapering down to 0", by 20" long, in order for these pieces to meet the plan specs and to get them to butt properly to the middle bottom hull sections. The cuts were on the outside of the pieces."
---->I have no clue about this. The nesting matches the dimensions.
That must have been a CNC machine problem. Fortunately, it was too large and easy to correct.
2) The aft and bow transoms were mounted on the building frame, at the distances and angles specified in the plans. A laser was used to precisely align everything. When the glued and assembled stringers were put in place, it was clear that they were about 3 inches shorter than the distance between the transoms. Part of this distance (1/2") can be explained by the fact that I did not account for the front cabin bulkhead fitting between the aft and bow portions of the stringers, as I had glued them up as one contiguous unit (instead of installing the bow portion of the stringers later, as indicated in the on-line building tutorial). However, having to recess the stringers 1/2 way into the transoms adds 9/16" for the bow transom and 1" for the aft transom (which is 2" thick for large motor usage). This adds up to: 3" - 1/2" + 9/16" + 1" = approximately 4 inches that the stringers were short. I do not recall what the exact measurements are, and I did not try and crawl under the boat to take them again. Thus, I cannot say whether this is a plan or kit error."
---->the kit: The transom that was in the nesting was too big. It was about 1-7/8" too big. The stringer tips in the nesting were about 1" too short.
The CNC file for those parts was taken from the nesting drawing but the nesting drawing is not to scale!
You corrected properly.
"This problem was corrected by moving the bow transom aft the proper distance so that the stringers would fit right. I knew this could change the way the bottom panels fit, so when we put the aft 3 building molds in, we reduced the distance between each of them a small amount. This was done because the bottom is much flatter in this area and I knew it would affect the shape/fit of the panels less than adjusting each mold position or just the front ones."
--->Once they do this.....the frames won't fit right.
That looks like an assembly mistake you made but again, you corrected it properly.
"Some of the kit frames were not wide enough. For example: According to the plans, Frame F should be 90-1/4" wide. The actual measurement is 88-1/4". Frame E should be 92-3/4", and the actual measurement is 90-3/4"."
---->The nesting matched the station dimensions....so I don't know about this.
Me neither . . . were those frames marked correctly?
"Several of the kit pieces that were supposed to be 3/8" plywood were actually 1/2". I have been able to work around this without too much problem and the small amount of extra weight should not affect the performance."
---->Not sure about this one either.
I discussed this with Eric. he asked permission to use 1/2" instead of 3/8 for cutting reasons. I checked and gave the OK, it has no effect on weigth (maybe 5 lbs total!) and can only be better question of strength.
-----------------------
Conclusion, it looks like there were some problems with the kit, some I understand, others not but you solved the problems. Sorry for those cutting mistakes. Email when you need paint or other supplies, we'll do something special.
All the dimensions on the plans are correct, it's a kit problem that does not affect those building from the plans. Eric and I have discussed this. In 95% of the cases, despite what we say on the plans (NTS = Not To Scale), our plans are to scale. Those parts were an exception. Right now, we do not cut kits from the nesting drawing anymore.
_________________
Jacques Mertens
---end original message---
My personal opinion on the whole deal...
The root of the problems were based on errors in the kit. The problem was exacerbated when we adjusted our assembly process upon encountering kit errors, resulting in a chain reaction of minor, correctable issues.
Jacques and crew have been instrumental in figuring out the root of the problem, and there's no doubt in my mind that they'll work with the kit manufacturer to ensure this doesn't happen again. Additionally, they appear to genuinely care about customer satisfaction, as evidenced by their promise to "do something special" next time we order supplies. Despite the fact that we've experienced these minor setbacks, I have been satisfied in my dealings with these guys, and I would freely recommend bateau for anyone who is building a houseboat (or any other type of boat.) "If you're building a houseboat, go to www.bateau.com for the plans, kit and supplies."
By the way, if you do end up ordering from bateau as a result of reading this blog, tell 'em that OzzyC sent you.
Sunday, October 16, 2005

Bad Epoxy Joint
We also went over the taped joints one last time. This one was the worst. There was a large gap in the joint. The gap had no epoxy in it, and the tape had bonded poorly at the seam. We cleaned things up and filled the joint with thickened epoxy.
Not a single tape joint was truly smooth. There were "waves" in the epoxy, so we smoothed it all out by laying thickened epoxy, using a sqeegee.

Not a single tape joint was truly smooth. There were "waves" in the epoxy, so we smoothed it all out by laying thickened epoxy, using a sqeegee.
Patched Front Transom Gap
We went around the entire boat and patched all gaps, holes, gouges, and so forth, with thickened epoxy.

...and Then I Went to Help Greg...
... work on his boat.
This week we did a final laying of thickened epoxy, in preparation for taping the seams.
In this photo, you will see a small gap between the transom and the hull, and a screw hole.

This week we did a final laying of thickened epoxy, in preparation for taping the seams.
In this photo, you will see a small gap between the transom and the hull, and a screw hole.
Flaw in the Rubrail
In a continuation of "back to basics" week, I will discuss this rubrail in a bit more detail.
We purchased 10-foot sections of oak, which is obviously too short for the entire canoe. We compensated for this by angle-cutting the oak sections and joining them together with epoxy. We did the joints at port-bow and starboard-stern, for load balancing. This way if we hit something that would break one joint, they both wouldn't break.
This spring, my boat hit a rock in rapids, and popped the rubrail joint. I tried patching the popped joint with gorilla glue, but that was inadequate for the job, and the joint popped again, (on a much smaller rock, at a much lower speed.)
As you can imagine, I was starting to get a little frustrated over my canoe continually "breaking." I figured it was time to do the job right, so I decided to sand and re-epoxy the joint from scratch.
Unfortunately, my daughter wanted to help, and due to a perfect storm of circumstances, I didn't quite mix the epoxy right, and it never quite set. Growing even more weary of this ongoing problem, I sunk a couple of bronze nails into the seams, figuring that would do it. That's when I sanded and painted the boat, and when I noticed the flaw in this picture. If you look VERY closely (not the best picture), you can see that there's no epoxy bonding the rubrail to the hull. Once the paint dries, but before I stain the rubrails, I will bond the rubrail to the hull with a thin line of unthickened epoxy.

We purchased 10-foot sections of oak, which is obviously too short for the entire canoe. We compensated for this by angle-cutting the oak sections and joining them together with epoxy. We did the joints at port-bow and starboard-stern, for load balancing. This way if we hit something that would break one joint, they both wouldn't break.
This spring, my boat hit a rock in rapids, and popped the rubrail joint. I tried patching the popped joint with gorilla glue, but that was inadequate for the job, and the joint popped again, (on a much smaller rock, at a much lower speed.)
As you can imagine, I was starting to get a little frustrated over my canoe continually "breaking." I figured it was time to do the job right, so I decided to sand and re-epoxy the joint from scratch.
Unfortunately, my daughter wanted to help, and due to a perfect storm of circumstances, I didn't quite mix the epoxy right, and it never quite set. Growing even more weary of this ongoing problem, I sunk a couple of bronze nails into the seams, figuring that would do it. That's when I sanded and painted the boat, and when I noticed the flaw in this picture. If you look VERY closely (not the best picture), you can see that there's no epoxy bonding the rubrail to the hull. Once the paint dries, but before I stain the rubrails, I will bond the rubrail to the hull with a thin line of unthickened epoxy.
Back To Basics
Building the Nice Canoes was our experiment. We built the canoes first, so we could get an idea of how much work building the GT-23 would be, and to make sure we were up for that kind of work.
I've had my canoe for about a year and a half, and I've used it a LOT. She was starting to show her age...
It was time for a new paint job. I sanded down the entire exterior, including the rubrails. This photo shows the paint job. Today or tomorrow I'll do a bit more painting, a little touch-up, and then it's into storage.

I've had my canoe for about a year and a half, and I've used it a LOT. She was starting to show her age...
It was time for a new paint job. I sanded down the entire exterior, including the rubrails. This photo shows the paint job. Today or tomorrow I'll do a bit more painting, a little touch-up, and then it's into storage.
Wednesday, October 05, 2005
Answers to Questions
As I mentioned in my last post, Greg asked a couple of questions about planing a swath along the seams, so the fiberglass lays flush to the hull after laying the fiberglass, as opposed to building up the layers of fiberglass, then fairing... thus saving us some sanding. Bateau recommended that we not do this. Here are a couple of other links that discuss the recommended methods of taping and sanding the seams...
Stitch and glue basic tutorial
Outside fiberglassing
Stitch and glue basic tutorial
Outside fiberglassing
Monday, October 03, 2005
Video Synopsis
It's been a while since we've made any significant progress on the boat, so we haven't done any videos for a while. In commemoration of what we've accomplished this weekend, we did a video. If you're interested, click here.
We plan to build the keel up one more time, and sand again, just to make sure we've got a straight line, and to make sure it's properly filled before we lay the fiberglass. If you're interested in seeing our plan for that, click here.
We plan to build the keel up one more time, and sand again, just to make sure we've got a straight line, and to make sure it's properly filled before we lay the fiberglass. If you're interested in seeing our plan for that, click here.
SandedHull
All of the seams are now sanded and rounded. We've got a procedural question in to the gurus about taping the corners. Apparently, some people plane the hull where the seams are, and the result is a lot less sanding. We'll let you know when we find out.


Trimmed Transom
Greg got the overhang trimmed from the front and rear transom, using a jigsaw. It looks a lot better now.

Subscribe to:
Posts (Atom)
