Sunday, March 12, 2006

The Good and the Bad and the Good

The fairing and sanding continues. Greg read about a really neat idea that will likely save us countless hours of eyeballing, and in the end, provide us with a significantly more accurate finished product...

In my last entry, you saw the level that showed approximately how much filling we need to do. Well, Greg decided to wrap that level in plastic, run a strip of filler under where the level was, and then essentially mash the level into the filler and let things dry. After the filler dried, he removed the level, shaved down the excess epoxy and voila, he had a "rail" that gave us a guide for how much filler we need to use. By running a second "rail" down the center, and a third one down the other side, we had a rail system built, which will allow us to roll out a single, thick, accurate layer of filler and dramatically reduce the amount of sanding and fairing we will need to do. A stroke of genius!


On the downside, when sanding yesterday, we came across a big spot that was starved for epoxy, as shown (and outlined) in the picture to the right. This is an area that's come back to haunt us from way-back-when. The area is approximately 4"X3." It's nothing that can't be overcome, but is a little frustrating.

We have yet to decide how to address the issue, but Greg has two ideas... one is to use fiberglass filler and epoxy, the other is to use glass micro-filler and epoxy. I've found one or two other spots like this, but they're small, in non-structural areas, and easy to fix.
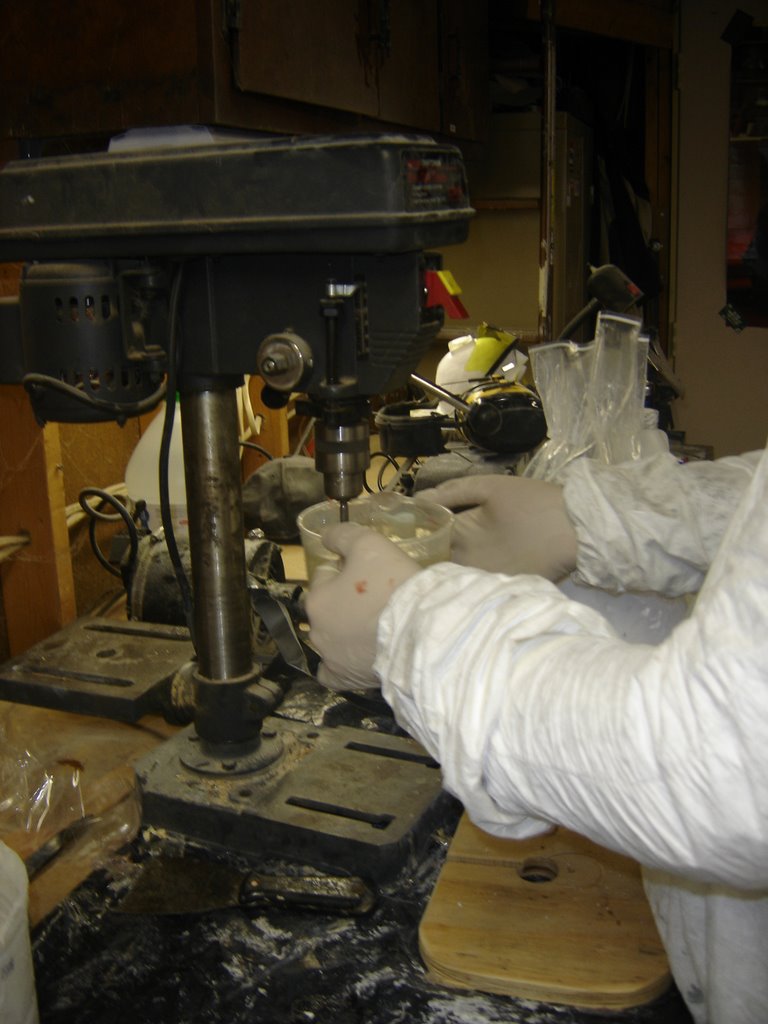


Here's another small stroke of genius Greg ran across...

-Are you tired of constantly stirring epoxy and/or thickener?

-Are you working by yourself and would like to save a little time?

-Are you working with fast hardener, and tired of worrying if it's going to kick too quickly?

If any of these problems apply to you, then you should try what Greg's doing in this picture to the right. Use a drill (or drill press) and a paint-stirring bit to do the work for you. It's quicker and easier. Just remember to take measures to protect your drill. It would really suck if you ended ruining your drill because it got all gummed up with epoxy.

Sunday, February 19, 2006

Time to Fair


Greg and I started the long task of filling in the low spots. This pic is a "before" shot that will show you how much area we have to fill.

You may also be interested in seeing me do another household project using epoxy.

Sunday, January 29, 2006

The Outside of the Hull is Glassed!

We reached another major milestone yesterday... we finished glassing the exterior of the hull. Now we're on to the long task of fairing and sanding. Based on our current pace, I expect this to take about three months.

Sunday, January 22, 2006

Glassed Rear Transom


Yesterday we glassed the rear transom. After we glass the front transom (which we plan to do next weekend), we'll be done glassing the exterior. Then comes the fairing.

We've gotten pretty good at laying glass, and have devised a method that lets us lay two layers at once. The first time we did it was a little tough, but through a little trial and error, we've got it down to a science. By doing two layers at once we are saving time and I think we'll have a stronger boat, because laying two layers at once will give us a single chemical bond in addition to the physical bond. It also seems to cut down on the amount of sanding we need to do.


Here's a picture of the glassed side (which we did last week). We glassed the side using the aforementioned both-layers-at-once method, and I'm quite pleased with the results. Glassing the side took us about four hours using this method, and the rear transom took about two hours.

Our double layer method consists of measuring the glass cloth and laying them in place, and laying a coat of epoxy thick enough to saturate both layers of glass. The horizontal surfaces are very easy, but the vertical surfaces are a little more tricky. We've found that it's best to use a roller to work a thick layer of epoxy into the glass at the top, and then slowly squeegee the excess down the side. Make sure to do this very slowly, so the epoxy has a chance to saturate the cloth as you go down. If the epoxy is rolling down the surface as you use the squeegee, you're moving too quickly.

One note: I do NOT recommend doing this double-layer method unless you've got two people for the task.

Saturday, January 14, 2006

I dropped by Andrew Lucking's site today. Andrew is building a VG23 sailboat, but has had to cease construction for the winter. In the meantime, Andrew has found a few cool links that you may find interesting...

Peter Gron is building an Arctic Tern Sloop that promises to be a beautiful lady when she's done. Peter came up with an brilliant way to make the stitches tight at the bow, but I'll let you read his web site and find it for yourself. He's also got great pictures of the jig he built for rolling the boat.

---Blatant lifted from Andrew's page, so I don't have to re-type---
I didn’t mean to but… - Tim Zim is in the midst of converting a fishing trawler into a liveaboard. Tim complains about busting rust the way I complain about sanding. And his “Lady Jane” is 90+ feet!

Ceilydh Under Construction
- Evan Gatehouse and family are reconstructing a Woods Meander 40′ catamaran. Any boat project that begins with a chainsaw is okay in my books.

Waterlogged: living on a wooden ship
- These folks are living aboard the MV Bowie, a 136 foot former WW II US Navy subchaser, as they renovate her. Something about life on a huge old wooden ship with a hot tub on her stern really appeals to me.
---End Blatantly Plagarized Section---

While you cruise through these sites (hopefully getting ideas and staying motivated about your own project), be assured that Greg and I are still sanding and laying fiberglass on the hull.

Saturday, January 07, 2006

Fiberglass Filler


Patched Hull
Originally uploaded by OzzyC.
Here's a picture of the fiberglass-filled patch. You see that Greg used epoxy filled with fiberglass particles, which he used to fill the areas he cut out, and blended in with the glass cloth. The strength is solid, and it will undoubtedly work better than the original plan of injecting epoxy into small holes. It's a little more work, but we both agree that it's worth it.

We Re-Interrupt this Program...


Shower Repair 8
Originally uploaded by OzzyC.
For an update on my shower repair. You may notice that my last update on this was in Mid-December. Since then I have had precious little time to work on the shower, and when I did work on it, the progress was slower for various reasons...

The patch job still isn't re-grouted and re-sealed, but that'll come in the next couple of days. And of course, it's not perfect, but it's designed to be a semi-permanent patch job, not a total reworking.

Monday, December 26, 2005

Back to our Regularly Scheduled Program

We laid some more glass yesterday, but I'm going to digress a bit.

You may remember in an earlier post that we had a couple of spots where the fiberglass didn't adhere to the plywood. Our initial plan was to drill small holes in these areas and fill them with epoxy. Greg changed his mind. Instead, he cut out these areas with a knife, and filled it with a mixture of epoxy and fiberglass filler. My camera batteries were dead, so I don't have any pics of this, but I will attempt to get some pics posted soon.

After the fiberglass filling, we did a little last-minute sanding, and laid fiberglass on one side. We've now got about two-thirds of the exterior completely fiberglassed. We still have one side, and both transoms to do, but that should go relatively quick. Of course I'll post pictures.

Saturday, December 17, 2005

Other Uses for Epoxy and Plywood - Part IV


Shower Repair 7
Originally uploaded by OzzyC.
In this photo, you see that I've done part of the bottom, or side, section. I was fortunate that this section came off in one large sheet, so I didn't have to re-lay individual tiles. The hardest part of re-laying the tiles comes next. Wish me luck.

By the way, if you're interested, you can also see my other home improvement project on my other blog. I figured that it was more appropriate to post this project here, since it so heavily utilizes plywood and epoxy.

Other Uses for Epoxy and Plywood - Part III


Shower Repair 5
Originally uploaded by OzzyC.
You can see that I've used thickened epoxy and laid the tiles on the top section. It's not pretty, but it's functional - and waterproof. I plan to drill out the epoxy between the tiles and re-grout. That will make things less ugly.

Other Uses for Epoxy and Plywood - Part II


Shower Repair 4
Originally uploaded by OzzyC.
In this picture, you see that I have installed the scrap plywood. the plyowood has been sealed with epoxy, so it should stay waterproof for until I truly remodel this bathroom. I've screwed it all into place with waterproof screws, and you may see that I've test-fitted a block of tiles.

Thursday, December 08, 2005

Other Uses for Epoxy and Plywood

By now, we're all familiar with using epoxy and plywood for building boats. But have you considered using plywood and epoxy for other jobs around the house? The previous owner of my house installed a tile shower, and used plain plain 2x4's and plywood for this water-catching lip. Over the years, water has gotten in here, and eventually it rotted away the plywood and the wood.

I'm not going to the trouble of completely ripping this out and starting from scratch, but I am going to repair it so it stays put until I'm ready to completely overhaul this bathroom. Enter the epoxy and plywood...

During the course of the next couple of weeks, I am going to epoxy the remaining wood, in an attempt to prevent any further deterioration. I will cut some scrap plywood to size and lay a protective layer of epoxy over that as well, which will waterproof the entire base. Finally, I will use thickened epoxy to stick the tiles back into place. Why epoxy instead of cement? Because I have the epoxy and plywood available. I'd have to go out and buy the cement. The only reason NOT to use wood is because of the rotting factor. By coating it all with epoxy, I have removed the potential for rotting.

Overall View


Some Good Spots
Originally uploaded by OzzyC.
As you can see, our work paid off in the end. For the most part, it looks really good, and you can't really tell where we ran out of epoxy.

Next time we'll lay epoxy on the sides, then it's time to start fairing and sanding.

Drilling Small Holes


Drilling Small Holes
Originally uploaded by OzzyC.
We're overcoming our problem by drilling small holes where the epoxy bubbles are. We will then inject epoxy into the holes and weight down the area, so the fit is as tight as possible in the end.

The Journey Continues


Flaws in the Epoxy
Originally uploaded by OzzyC.
You may remember from our last couple of entries that we ran out of epoxy. In order to overcome this potentially disasterous problem, we heated the cured epoxy with a heat gun, and applied epoxy to the rest of the boat.

This picture shows that, for the most part, our approach worked incredibly well. However, also shown in the picture, we had a few spots that were completely starved and didn't adhere to the hull at all.

How did we overcome this problem??? Read on and find out.

Tuesday, November 29, 2005

Heating Fresh Epoxy


Heating the Transom II
Originally uploaded by OzzyC.
There were a couple of areas on the rear transom where the glass didn't lay down to our liking. Greg decided to see if heating the epoxy in this area would work. After a few minutes, we discovered that the epoxy got very thin and dripped a lot. This tended to starve the fiberglass, didn't help the fiberglass adhere to the plywood at all, and the epoxy that remained in the fiberglass had dried enough to touch after a mere five additional minutes.

In short, I don't recommend using a heat gun on uncured epoxy. It's a good way to give yourself a second chance on cured epoxy though. In fact, I'd call it a sheer stroke of genius on Greg's part.

Glassed Bottom


Glassed Bottom
Originally uploaded by OzzyC.
The rest of the bottom has been glassed. As I write today's entry, we're waiting for the epoxy to completely cure. This weekend, we'll touch up any areas that need it, do a little sanding, and lay glass on the sides and transoms as needed.

Weighting the Transition Area


After the Next Round of Epoxy
Originally uploaded by OzzyC.
To help ensure a good bond in the area where we ran out of epoxy, we laid a slightly thicker layer of epoxy, then laid a sheet of plastic over the transition area, laid a piece of plywood over all of that, and weighted it down. From the transition point on, we epoxied as normal.

Quick Heating and Quick Cooling


Heating the Glass Close-Up
Originally uploaded by OzzyC.
As mentioned in the last entry, we used a heat gun to heat up the stiff fiberglass, and soften the epoxy. Immediately upon softening, we laid a cool metal weight on top of the newly-softened fiberglass. This helped the fiberglass lay flat as it should.

As we went, we learned that we could run the heat gun in front of the weight, which would heat the fiberglass and epoxy, and we could immediately slide a weight behind the heated area. this would ensure the area would lay flat. I've gotta say, it was a pretty clever trick.

An Answer to our Glassing Problem


Heating the Glass I
Originally uploaded by OzzyC.
We ("we" being Greg for the most part) thought about possible solutions for our problem on how to get the partially-wetted fiberglass to properly adhere to the hull. After a week or so, Greg found the answer. We used a heat gun and softened the epoxy in the areas where the fiberglass was bubbled up from the hull.