Yesterday we did the final gluing of the stringers, and so far this is the part that I'm most concerned about. We butt-joined the wider piece on the left to the narrow piece on the right. The now-joined stringer runs from the bow transom to the stern transom, and form the entire bow-to-stern frame pieces.
My concern is that that we'll break this specific joint in the period between when the joint dries and when we actually mount the pieces. I'd highly recommend using a two-person moving method with these completed pieces. Set the stringers vertical (so they're facing the way they will face when finally installed). Have one person lift with one hand on either side of the joint in this picture, and one person lift toward the back of the narrow section. I may do another video on this to more efficiently demonstrate what I'm talking about.
But I'm digressing...
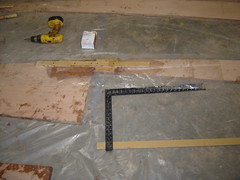
Let's assume this joint is as strong as I'd hope it should be... let's concentrate on what we did to set this butt joint... As usual, saturate all of the surfaces to be joined with unthickened epoxy, and saturate the fiberglass tape. Lay a coat of thickened epoxy on butt joints. Lay the plastic on the floor. Lay the bottom piece of fiberglass tape roughly where you want it. Set the boards on top of the bottom piece of fiberglass tape, and preset the butt joint. Lay the top piece of fiberglass tape on top of the plywood butt joint. Lay a piece of plastic on top of all of this. Use a square to get a precise 90 degree angle, as the picture hints at. Then use a piece of scrap wood, and temporarily screw the scrap wood to both sides of the butt joint. This will help keep the butt joint from floating during the curing process.
Remember, if you click on the picture, you can see the picture complete with comments and tags on the pics that can help you visualize what I'm discussing. Again, the picture is courtesy of www.flickr.com
No comments:
Post a Comment